(Relatively) Safe Disk Cleaning
Tips on cleaning up your storage in Windows.
Safe
Disk Clean Utility
Do the basic-est of cleanings. Open the Disk Cleanup application from the Start menu, select "Clean up system files", check all the boxes, and click OK. This is guaranteed safe as it is the Microsoft tool for recovering space.
-
 Open the Disk Cleanup application
 -
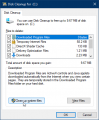 Select Clean up system files
 -
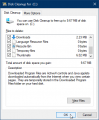 Select all and click OK
 -
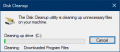 Wait and enjoy


CompactOS
One of the lesser known features to arrive with Windows 10 is a new compression mechanism: CompactOS. This option was introduced to reduce the Windows 10 footprint of devices with limited space, e.g., tablets and notebooks with smaller SSDs.
The CompactOS replaces the Windows 8.1’s Windows Image File Boot (WIMBoot) feature that allowed you to boot from a compressed .wim image file. This allowed Windows to run on small devices. However, running a WIMBoot PC is slower as Windows need to spend more CPU cycles to decompress the files.
The CompactOS feature in Windows 10 is better than WIMBoot as it’s easier to configure and use. And the best part–you can even use if after you have installed Windows 10.
Please note that you should only enable CompactOS if you are really stuck with tight storage space. On a normal PC with a decent storage, this will only slow down the system and affect the user experience.
-
 Checking/enabling CompactOS

First, open up an admin PowerShell or command prompt. Then issue the following commands to check/enable/disable CompactOS.
- Query
Compact.exe /CompactOS:query
- Enable
Compact.exe /CompactOS:always
- Disable
Compact.exe /CompactOS:never
Relatively Safe
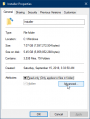
Compress C:\Windows\Installer
The C:\Windows\Installer location contains the uninstaller applications that are launched when you select a program from Add/Remove Programs. This code is very rarely used and in 99% of cases it is safe to use compression on it to regain some space. The exception to this seems to be ancient or poorly coded applications which never expected NTFS compression on anything.
Open Windows Explorer and navigate to C:\Windows\Installer. Note that if you browse to C:\Windows,the Installer folder is a protected OS location, so it is not shown under C:\Windows by default. Right click on any whitespace in the Installer folder and click on the properties menu. Under the default General tab, click the Advanced button. Select the "Compress contents to save disk space" box and click OK. Click Apply back in the Installer Properties window to start compressing the folder.
-
 Go to C:\Windows\Installer
 -
 Select properties...
 -
 Click advanced...
 -
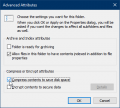 Select Compress contents
 -
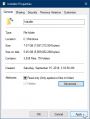 Finish the application


Really clean Windows Update
The automatic update cache is stored under C:\Windows\SoftwareDistribution\Download and can become quite large from time to time. In order to reclaim this space we'll need to contend with Windows Update and allow it to rebuild the folder after removal. Start an Administrator command prompt and enter the following:
net stop wuauserv
rename c:\windows\SoftwareDistribution softwaredistribution.old
net start wuauserv
exit
Check that both SoftwareDistribution and softwaredistribution.old exist under C:\Windows\. Reboot your machine and verify that Windows Update hasn't lost its mind. If everything functions normally, you can safely delete C:\Windows\softwaredistribution.old.